How To: Set Up Your Development Environment for Uno Platform Apps
In the following, we will look together at how to easily set up the development environment for application development with Uno Platform, or rather, how the Command Line Interface (CLI) tool dotnet tool uno-check can take care of this routine task for us.
Tip
Since the v6 release of Uno (SDK & Extension), this is already included in the Visual Studio Uno Platform extension from the start!
Tip
If you have problems running the tool, you can find the associated Official Guide to Uno-Check from Uno Platform here.
Video Tutorial
Note
This video is currently only available in German, but transcriptions have been added to the video description, which should be usable through YouTube's auto-translate feature. You can also enable auto-translated subtitles in YouTube to follow along in your preferred language.
Note
The most up-to-date guide for getting started with Uno Platform can always be found in the official Quick Start Guide.
Step-by-Step Setup Guide
Choose and install your preferred IDE
Note
This guide uses Visual Studio 2022 Community Edition. If you work with Rider or Visual Studio Code, please refer to the previously linked Quick Start Guide for any differences!
Official Visual Studio Installation Page - also VS Code
IDE: Integrated Development Environment
Install the Uno Platform Extension
Available in the Visual Studio Marketplace
Install
Uno.Checkvia the Command Linedotnet tool install -g Uno.CheckRun
Uno.Checkto verify your environmentEither via the terminal you used before:
uno-checkOr as mentioned earlier, since version 6 of the Visual Studio Extension from Uno Platform, we can already use
Uno.Checkautomatically there in our IDE. So whenever we open our solution, it runs automatically, or we can also trigger it manually in the Extensions drop-down menu in Visual Studio > Uno Platform >Run Uno.Check. It then checks which target devices we have specified in our project file and verifies all the necessary installations for existence, but also whether we are working with the latest available versions. This is especially helpful when bug fixes have taken place and of course also when there was a new major release.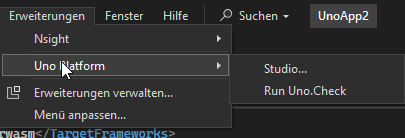
Configuration Options for Uno Check
If you only want to develop your applications for specific targets, i.e. target devices, and therefore don't need all other workloads, for example for the XamlNavigation Tutorial
Tip
To get an overview of the available commands, configurations and optional associated parameters, you can type uno-check -h in the terminal.
Note
You can find more information about configuration options in the Uno.Check Documentation!
Problems During Setup?
Check out the Troubleshooting Guide.
Next Steps
Once your environment is set up, in addition to the tutorials here, you can also start with the Counter Workshop and learn these basics:
- The structure of an Uno app
- Handling assets (images/icons) via
Uno.Resizetizer - Using commands and bindings